Introduction
LET'S GROW SOME BEANS!!!
Year 4,
We have something VERY exciting to look forward to....
I wonder, has anyone ever grown their own vegetables, fruit or herbs before?
Sometimes, we have a lemon tree or an orange tree in our backyards, or we might even have a little herb garden in our kitchen or just outside the back door.
Well, this term our little class is going to be growing some beans... How exciting!
If you click on the link below, you will be able to see a time lapse video that shows a bean growing. This is very cool, you just wait and see.
https://www.youtube.com/watch?v=fYY9X5Lw1V4
A note for parents/caregivers
Seed starting in the classroom is a great way to engage students in hands on lessons that allows them to use observational skills, apply the lesson method, and as a beneficial result they will have been able to nurture and watch their beans grow.
As this will be the first time for many of the students’ growing seeds, we will encourage students not to be afraid to ask questions in relation to the process. We will likely provide the students with some additional learning opportunities to be completed at home where possible. Please rest assured that those students who do not have the resources available to them at home, will not be disadvantaged as there will be time also allocated during school hours as well as class discussions to collaborate the information. Learning is a fun experience and so as a class, we will also attempt to look up questions together as these will most likely be questions that the class as a whole will have.
We have also arranged a "Buddy Program" with a school in Helsinki. The aim of this is to provide our students with opportunities to talk to a class in another country, learn about their climate, environment and weather patterns and to compare the process of growing beans from our warm and dry climate in Australia to the cold conditions of Helsinki. Students will be conversing with their 'Buddy's' via Skype sessions that will be run in the classroom and closely monitored by the teacher.
Growing seeds provides numerous teaching and learning opportunities for students of any age, from identification of seed and seedling parts to investigation of more complex processes, including germination and photosynthesis. As teachers we will look to draw from this Focus Project in other key learning areas, including; Maths (measurement, division, graphing), English (forms of writing styles such as procedures, journal writing and narratives) and Geography (talking about our Helsinki and the environment/weather that might influence the way in which their seeds grow).
Should you require any further information or would like to offer some time on Wednesday of Week One next term from 11.30am to come in and help our class ‘plant’ their beans, please email either Miss Simpson or Mrs Scott.
Thank you for your continued cooperation.
Task
TASK
Your job as a ‘bean gardener’ is to follow the instructions that are given in the next section called ‘Process’ to prepare the ‘home’ for your bean seedlings. While still following the instructions, you will plant your two bean seedlings and find both a warm, light spot in the classroom to place your first bean (Windowsill) and a cold dark place for your second bean (cupboard).
Over the next six weeks, you are in charge of taking extra special care of your beans.
You will be given time in class each week to look after your plant and complete some activities that will be instructed by your teacher. You will also be responsible for keeping an accurate and up to date 'Bean Diary' that documents the growth of your bean through diary entries including measurements and photographic evidence. These 'Bean Diaries' will be completed via an online blog that has been set up by your classroom teacher and the link can be found below;
https://kidblog.org/class/mrs-scott--miss-simpson
These blogs will also be accessed by our buddy class in Helsinki and you will have access to theirs in return so that we can compare and contrast the growth of everyones beans and the different environments in which they are being grown in.
At the completion of this Focus Project, you will have successfully grown a bean plant from a seedling. You will also have kept a thorough record of the growth process as well as a diary on the changes that you notice your bean going through.
As an added benefit to this unit, you will have been able to meet, chat with and learn from a buddy student from a class in Helsinki.
Process
What will we be doing and how will we do it??
To begin with, after an in depth class discussion, a reading of Jack and the Beanstalk and creation of a Mind Map about what we already know about Beans, planting and growing our own food, we will need to prepare our little 'gardens'. To do this we will all complete the following proces, in a step by step manner, while watching the teacher;
PROCESS
The following is a list of items each student will need to get started…
• Seeds
• A clear plastic drinking cup
• Kitchen towel (2 pieces per student)
• A window sill & Cupboard space
• Water (preferably in an atomizer)
INSTRUCTIONS ON HOW TO PREPARE AND PLANT YOUR BEAN
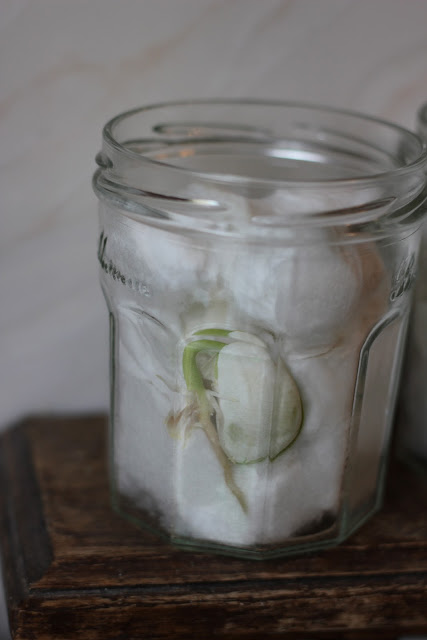
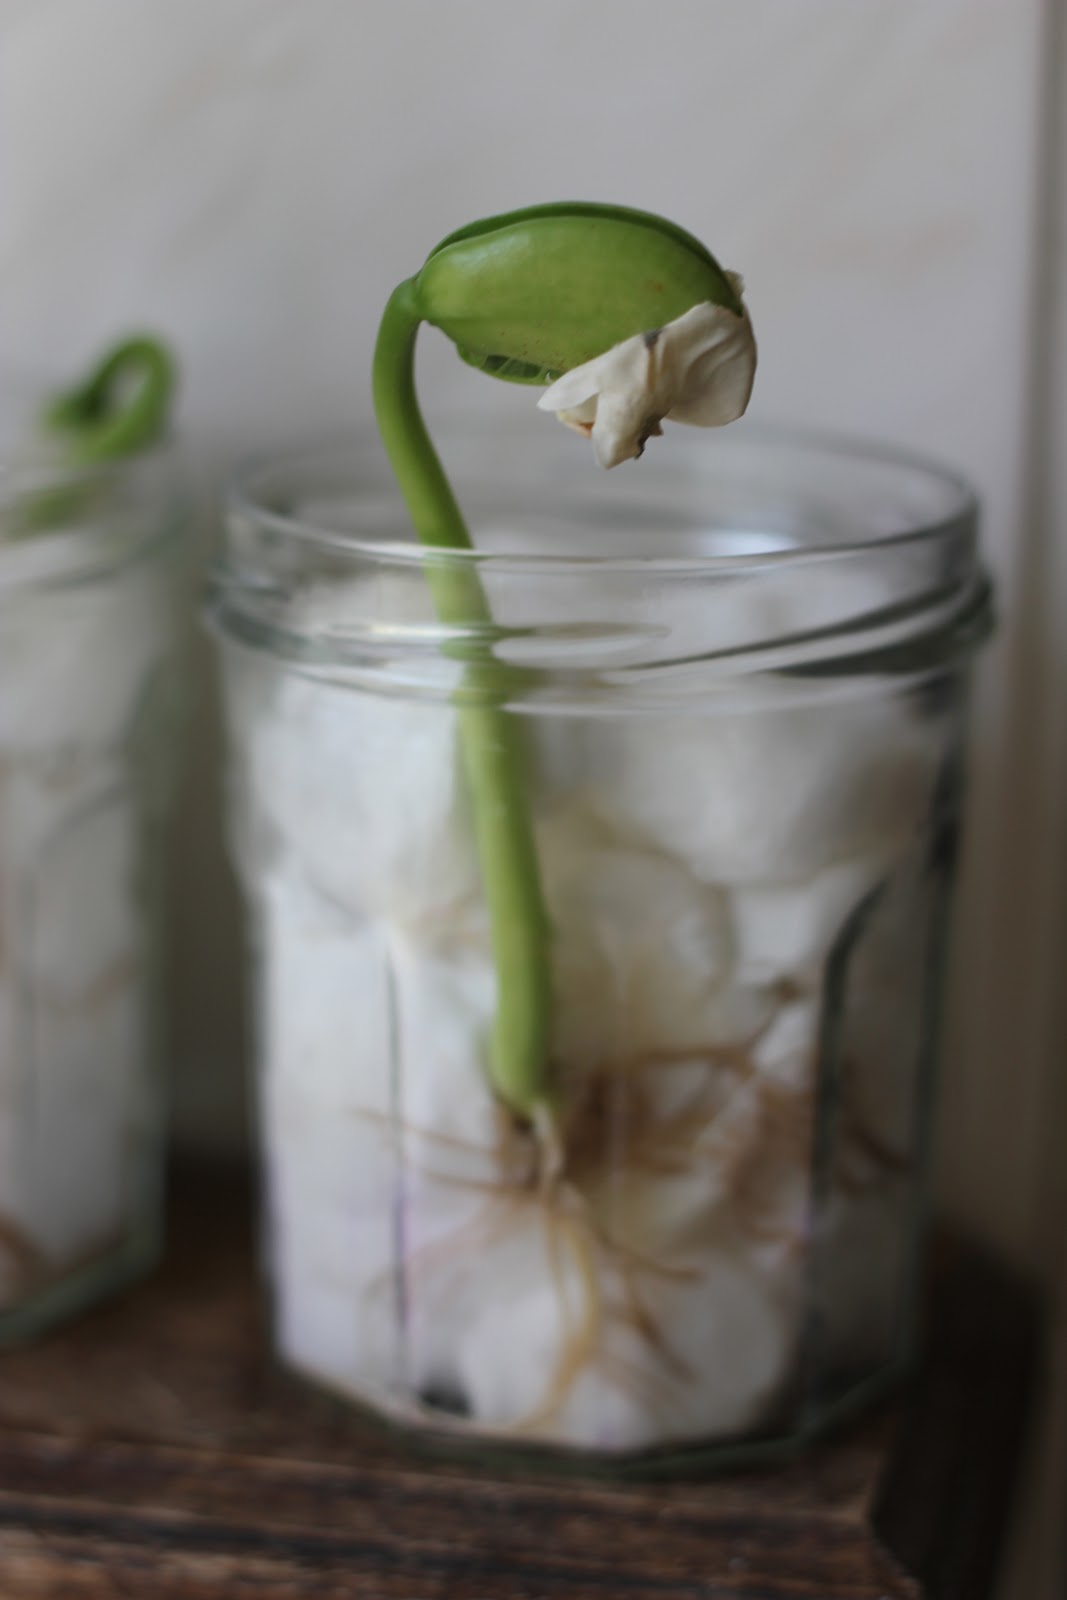
- Make sure your clear plastic cup is clean
- Select 2 broad bean seeds from the seedling packet and put to the side.
- Using two pieces of dry paper towel, place one on top of the other and fold in half.
- Place the paper towel around the inside of the plastic cup sides.
- Insert the beans one a time.
- One bean seed on one side of the cup and the other bean seed on the opposite side of the cup
- Your beans should not be on the bottom of the cup but about 2cm from the bottom.
- Using the water atomizer, spray the paper towel with water.
- Avoid soaking the paper towel.
- Place in a nice bright spot in the classroom (this can be on our windowsill near the teachers desk)
- Make sure you water your seeds every other day.
The stages of growing your bean will look similar to the pictures below;

After we have completed setting up our little 'gardens' in a plastic cup, we will need to set up a way in which we will keep a record of our beans growing. To do this we have each be given access to a 'Bean Diary', in the 'Task' section of our WebQuest.
Below are some more links for you to take a look at to find out some more information on growing beans.
More resources for growing beans;
How to grow a bean in a plastic cup
https://www.youtube.com/watch?v=U9SWwnWe0VQ
Helpful tips and ideas for growing beans in the classroom
http://www.kidsgardening.org/node/96821
Tips for growing beans in the garden
http://www.gardeningknowhow.com/edible/vegetables/beans/tips-for-growin…
Evaluation
BEAN DIARY
MARKING RUBRIC
|
Points |
1 |
2 |
3 |
4 |
Total |
|
Subject Knowledge |
Student does not have a good grasp on the information. Statements are incorrect and unsupported. |
Student has left out important information and details. Presents inaccurate information. |
Student is at ease with the topic and presents accurate information. |
Student is able to demonstrate a full picture of the topic presenting complete and accurate information. |
|
|
Explanations from Evidence |
The student has no conclusion or the conclusion is not related to the evidence provided in the Bean Diary. |
Conclusion is very poorly related to the evidence in the Bean Diary. |
The student has used some data, prior knowledge, research and experience to draw conclusions but has ignored other evidence provided in the Bean Diary. |
The student uses all available data, and their prior knowledge, research and experience to draw conclusions. Where appropriate, student also calls upon discussion to present conflicting evidence. |
|
|
Tables Graphs Graphics |
Bean Diary includes no graphics or photo representations of the bean growth process. |
Student doesn’t explain photos, tables or graphs when included. These conflict with evidence provided. |
Photos illustrate evidence that supports the conclusion. Tables and graphs used are not correct but include accurate representations of conclusions. |
Appropriate photos clearly present the information that supports the conclusion. Student accurately explains any graphs/tables that are included. |
|
|
Conclusions |
Not presented. |
Mostly inconsistent with evidence provided. |
Only partially supported by the evidence. |
Based on the evidence and data presented, the conclusions are accurate. |
|
|
Questions |
Student can’t answer questions about this topic. |
Student can only answer basic questions but is unable to substantiate these with evidence. |
Student is at ease with most questions on this topic but fails to elaborate when prompted. |
Student answers all class questions with elaboration and explanation. |
|
|
|
|
|
|
Total Points |
/20 |
Conclusion
CONCLUSION
A very big thank you to a wonderful Year Four class for their fabulous efforts in growing beans from tiny seedlings to beautiful big plants.
From completing this WebQuest, you have been able to learn so much about, not only the process of growing a plant, but we have also been on a very exciting learning journey that has taught us so much.
These are just some of the many things that we have learnt during our growing journey;
- Keeping a Bean Diary that included taking photos and filling out a template that explained the changes of our beans from week to week.
- You have made some new friends in another country.
- You have learnt about the climate, environment and weather patterns in another country.
- You have learnt about how growing plants differs in warm environments compared to cold environments.
- You have made your very own seedling packets by using your creativity.
- You have learnt a lot about taking measurements and recording them.
- You have also developed your skills in presenting ideas through both factual texts and narratives.
Credits
CREDITS
Miss Simpson and Mrs Scott have created this unit of work in order to help students understand the far-reaching effects that sustainability has in our lives.
Teaching students the value of growing their own food, and creating a sustainable way of life was the ultimate goal in this unit, however, students have also had the opportunity to learn through a variety of other key learning areas through out the journey while drawing on the core of the Focus Project.
At this point, we would like to reference the use of some ideas from other teachers who have ‘paid it forward’ by making available over the Internet and Pinterest their fantastic ideas in relation to this topic of growing beans.
We would also like to give credit to the Lecturers and University of Wollongong for their powerpoint presentation on Growing Beans and Lettuce, as some of these ideas were used in the creation of this unit of work.
Teacher Page
TEACHER’S PAGE
School gardening activities provide teachers with the opportunity to reinforce the concept of sustainability. Growing broad beans is a wonderful way for children to:
- Learn about gardening
- Develop a positive attitude towards the environment
- Reinforce a sense of ownership and responsibility
Plus it’s very exciting to watch how FAST the plants grow given that broad beans are a very fast growing plant and, like all legumes, are highly nutritious. Legumes are a valuable source of protein, fibre, potassium, folate, B vitamins, magnesium and iron.
Links to the curriculum are as follows;
Science syllabus – Stage 1
Stage 1 outcomes - Living World
ST1-9ES identifies ways that people use science in their daily lives to care for the environment and the Earth’s resources
ST1-10LW describes external features, changes in and growth of living things
ST1-11LW describes ways that different places in the environment provide for the needs of living things
Content
- Living things have a variety of external features. (ACSSU017) Students:
- Describe some external features of a variety of living things, including plants and animals.
- Living things grow, change and have offspring similar to themselves. (ACSSU030) Students:
- Record the changes in growth of a common plant or animal, using informal units, provided tables and digital technologies as appropriate.
- Observe and record some of the changes a common plant or animal shows during its life, using an appropriate digital technology, eg a camera.
- Compare the appearance of adult living things with their offspring, eg trees, insects, birds, reptiles, cats or humans.
- Living things live in different places where their needs are met. (ACSSU211) Students:
- Observe the different places in a local land or aquatic environment where
- Living things can be found, eg a schoolyard, pond, beach or bush
- Explore the needs of a plant or an animal in its environment
Observe and record ways people use science knowledge and skills in their daily lives to care for living things, such as gardeners, farmers or pet carers
Prior knowledge and project preparation
- Create a class mind map on the topic of beans. Use the mind map to facilitate discussion about what children know about beans.
- Children identify conditions needed for bean germination (eg moisture, temperature, light, soil).
- Children then create a word wall and make a list of growing words (eg germination, roots, shoots, stems, beans, water, sunlight, soil, and photosynthesis.
Project Focus
Growing broad beans
- In groups of 3–4, children investigate and discuss the life cycle of the broad bean (ie seed germinates – the first root grows downward – root continues to grow – shoot pokes out of the seed and becomes the stem – secondary roots form – the first real leaves emerge from between the cotyledons – stem straightens out and the shoot sprouts leaves – flowers appear – and when the flowers start to wither, the ovary of the flower turns into bean pods).
- In pairs, children make their own poster of the life cycle of a broad bean.
- At the end of the 6-week time frame, students will draw conclusions about the accuracy of their drawings from the beginning of the project by comparing them to the actual growing activity.
Project Method
- Firstly line the clear plastic cup with kitchen towel that has been dampened.
- Place one bean on either side of the cup (about ¼ of the way from the bottom) so that the students can watch two growing at once. Any beans straight out of the packet that are bought in the dried beans and pulses section in the supermarket will do for this experiment.
- Place the beans in a warm sunny place (windowsill is a good idea).
- Within 2-3 days the bean will start to sprout a small root, and 2-3 days later should grow or be close to growing little tendrils.
- Another 4-5 days and the bean will develop a large network of shoots coming off the main root, and a sturdy stem should grow straight upwards.
- The shrivelled husk of the bean skin should fall away from the plant at this point.
- Just a day or so later some green leaves should begin to unfurl.
- Finally, 4-5 days later the beans should be growing very steadily, tall and spindly with large leaves seeking out more sunlight.
- At this point you might like to carefully remove the plants from the jar and examine the complex network of roots that have been established.
- A final step in this task might be to have established a common garden area within the school where these beans can be grown (amongst other vegetables) and used in the school canteen.
Further Inquiry that is possible as a class might inlcude;
- Students will gather information to assist with the preparation of a school garden plot (eg from parents, grandparents, internet, printed resources).
- Students will collate the information and develop an action plan to assist with the task (eg children keep a journal to record their activities and share with others).
- Find a safe sunny spot at school and prepare the garden plot to grow your broad beans (if space isn’t available, planter boxes, barrel halves or an old wheel barrow will do).
- Children are assigned daily tasks to ensure the beans grow successfully.
- Teachers should look to involve other classes within the school across all stages as part of their sustainability studies.
- Whilst the broad beans are growing in the garden plot, children pose scientific inquiry questions related to their growth based on the table below;
[img_assist|nid=25478|title=Pic 15|desc=|link=none|align=left|width=734|height=139]
Cross-curricular linking ideas;
English Syllabus – Stage 1
Writing and representing 1
Outcome
EN1-2A plans, composes and reviews a small range of simple texts for a variety of purposes on familiar topics for known readers and viewers
Content
- Understand how planning, composing and reviewing contribute to effective imaginative, informative and persuasive texts
- Experiment in all aspects of composing to enhance learning and enjoyment
Respond to and compose texts
- Compose texts supported by visual information (eg diagrams and maps) on familiar topics
Spelling
Outcome
EN1-5A uses a variety of strategies, including knowledge of sight words and letter–sound correspondences, to spell familiar words
Content
Understand and apply knowledge of language forms and features
Know that regular one-syllable words are made up of letters and common letter clusters that correspond to the sounds heard, and how to use visual memory to write high-frequency words (ACELA1778)
Respond to and compose texts
- Spell high-frequency and common sight words accurately when composing texts
- Spell known words using letter names
- Isolate and write the initial, medial and final sound of a word
Writing and representing 2
Outcome
EN1-7B identifies how language use in their own writing differs according to their purpose, audience and subject matter
Content
Understand that different types of texts have identifiable text structures and language features that help the text serve its purpose (ACELA1447, ACELA1463)
Respond to and compose text
Compose and review written and visual texts for different purposes and audiences
Grammar Punctuation & Vocabulary
Outcome
EN1-9B uses basic grammatical features, punctuation conventions and vocabulary appropriate to the type of text when responding to and composing texts
Develop and apply contextual knowledge
- Understand that ideas in texts can be organised to enhance meaning using sentences and paragraphs
- Begin to understand that choice of vocabulary adds to the effectiveness of text
Understand and apply knowledge of language forms and features
- Understand that paragraphs are used to organise ideas
- Understand that simple connections can be made between ideas by using a compound sentence with two or more clauses usually linked by a coordinating conjunction (ACELA1467)
Explore differences in words that represent people, places and things (nouns, including pronouns), happenings and states (verbs), qualities (adjectives) and details such as when, where and how (adverbs) (ACELA1452)
[img_assist|nid=25479|title=Pic 16|desc=|link=none|align=left|width=432|height=452]
[img_assist|nid=25480|title=Pic 17|desc=|link=none|align=left|width=452|height=451]
Create a ‘Bean Diary’ that records the progress of the bean once a week. In the first week however, you might like to offer the students time twice as there should be significant changes in the first 5-7 days.
[img_assist|nid=25481|title=Pic 18|desc=|link=none|align=left|width=290|height=378]
[img_assist|nid=25482|title=Pic 19|desc=|link=none|align=left|width=289|height=359]
Maths Syllabus – Stage 1
Statistics and probability
Data – Outcomes
MA1-17SP Gathers and organises data, displays data in lists, tables and picture graphs, and interprets the results
Content
Collect, check and classify data (ACMSP049)
- Collect data on familiar topics through questioning, eg 'How many students are in our class each day this week?'
- Create displays of data using lists, tables and picture graphs and interpret them (ACMSP050)
- Represent data in a picture graph using a baseline, equal spacing, same-sized symbols and a key indicating one-to-one correspondence
[img_assist|nid=25483|title=Pic 20|desc=|link=none|align=left|width=640|height=428]
[img_assist|nid=25484|title=Pic 21|desc=|link=none|align=left|width=372|height=452]
- Students can draw a picture of what the plant looks like every 3-4 days, add a measurement and label the diagram with the parts of the plant as they develop. Alternatively, they could record using a digital camera and printing and sticking in their own photos.
- Measure the growth of the bean and make comparisons, create a growth chart to track progress
LOOK AT MARKING RUBRICS TO ADD FURTHER TEACHER NOTES ON;
- ADAPTABILITY
- WHAT TO DO AHEAD OF TIME
- WHAT MIGHT GO WRONG AND THE ADJUSTMENTS IF THIS HAPPENS.