PRODUCING NON-PROJECTED DISPLAY MATERIALS

Introduction

Various non-documentary materials can be displayed to or studied by learners without the need for an optical or electronic projector constitute some of the most basic- and most useful- of all teaching and learning aids.

In this webquest, we will carry out a detailed examination of such displays, starting by taking a general look at how they can be used in different instructional situations. After this, we will examine the main types of non-projected display in turn, looking first at chalk boards and markerboards, then at 'adhesive' display systems (feltboards, hook-and-loop boards and magnetic boards), then at charts, posters and other flat display materials, and finally at three-dimensional displays (mobiles, models, and so on). In each case, we will identify the main uses of the displays and show how they can be produced 'in-house' by teachers, instructors and trainers.

Task

Your task is to read and study the topics found in the address links below and after, create your group with 3members and decide for the kind of non-projected display materials that you are going to use according to your objectives or purpose. You should be able to make your group lesson plan that shows how you will execute or apply your chosen media to the learners.

SAMPLES OF NON-PROJECTED DISPLAY MATERIALS

CHALKBOARD 


 MODELS

FELT BOARD          

 FLIPCHARTS

DIORAMA

 MAGNETIC BOARD

ELECTRONIC MARKERBOARD

POSTER AND BULLETIN

More Study References Below:

1. http://www.telt.um.edu.my/6-2nonprojected.html

2.https://word.office.live.com/wv/WordView.aspx?FBsrc=https%3A%2F%2Fwww.facebook.com%2Fdownload%2Ffile_preview.php%3Fid%3D212196148970155%26time%3D1395903191%26metadata&access_token=1671870771%3AAVJbvI-gMdgeHUSJnE5LWXSxtHZTR1xKIe4cdrGwGPxbxw&title=HO+10+PRODUCING+NON+Projected+Long.doc

Note: if this link won't open, try copying the URL and paste it on the search box.

Here are some slides I prepared for your study. These are derived from the second link (hand-out10)

3. <iframe src="http://www.slideshare.net/slideshow/embed_code/32211858" width="427" height="356" frameborder="0" marginwidth="0" marginheight="0" scrolling="no" style="border:1px solid #CCC; border-width:1px 1px 0; margin-bottom:5px; max-width: 100%;" allowfullscreen> </iframe> <div style="margin-bottom:5px"> <strong> <a href="https://www.slideshare.net/tseri22/three-dimensional-3-d-display-materials-32211858" title="Three dimensional (3 d) display materials" target="_blank">Three dimensional (3 d) display materials</a> </strong> from <strong><a href="http://www.slideshare.net/tseri22" target="_blank">tseri22</a></strong> </div>

4.<iframe src="http://www.slideshare.net/slideshow/embed_code/32211859" width="427" height="356" frameborder="0" marginwidth="0" marginheight="0" scrolling="no" style="border:1px solid #CCC; border-width:1px 1px 0; margin-bottom:5px; max-width: 100%;" allowfullscreen> </iframe> <div style="margin-bottom:5px"> <strong> <a href="https://www.slideshare.net/tseri22/magnetic-boards-32211859" title="Magnetic boards" target="_blank">Magnetic boards</a> </strong> from <strong><a href="http://www.slideshare.net/tseri22" target="_blank">tseri22</a></strong> </div>

5. <iframe src="http://www.slideshare.net/slideshow/embed_code/32211860" width="427" height="356" frameborder="0" marginwidth="0" marginheight="0" scrolling="no" style="border:1px solid #CCC; border-width:1px 1px 0; margin-bottom:5px; max-width: 100%;" allowfullscreen> </iframe> <div style="margin-bottom:5px"> <strong> <a href="https://www.slideshare.net/tseri22/posters-32211860" title="Posters" target="_blank">Posters</a> </strong> from <strong><a href="http://www.slideshare.net/tseri22" target="_blank">tseri22</a></strong> </div>

Process

Through the given Links as your study guide and references, You must choose one (1) non-projected display material that you will use in your lesson plan.

•This is a sample format which may be used for group instruction. Any format followed should include: Objective, Preparation, Procedures, Questions and Evaluation 

LESSON PLAN OUTLINE 

Name :____________________ Date:______________________

Grade Level:________________ Length:_______________________

Topic:

I. Objective: 

Write a behavioral objective with conditions, the behavior, and criteria for mastery. You may also use a non-behavioral objective if it is appropriate.

II. Preparation

Purpose: 

The purpose of this lesson is the reason for teaching the lesson: to introduce, to give information, to help organize information, to demonstrate knowledge, to provide enrichment or a chance for creative application.

Materials:

List teacher references 

List materials students will need

III. Procedure

A. Anticipatory Set: 

You are motivating your students to want to learn this material. Link the material to students’ background knowledge and experience; create a puzzle or use an analogy to get them thinking along the lines you want to go. Share the relevance of the lesson to students’ lives. Overtly link your anticipatory set to the body of the lesson. 

B. Body of the Lesson/Input:

This is the body of the lesson. You can give input in many ways: use a visual aid, show a video, read, lead a discussion; you can give input or you can draw it from the students or from print or media. 

1. Outline and label steps in the lesson

You will outline each step you will be using to develop the lesson. If you are following a specific strategy, your steps in the plan will match the steps in the strategy.
Sample steps could be:

Step 1: Show and discuss visual aid. 
Step 2: Complete a sample problem. 

2. Content and Key Questions 

Under each step indent and list the KEY questions, directions, or content you need to present. Write the actual question when possible but remember you are not writing a script.
Step 4: Elicit application
What else could someone do who was in the same position as Susan?

DO NOT WRITE: Ask the students what they would have done.

Give examples, model processes, demonstrate steps, and ask questions at varied levels to help you monitor students’ growth and to adjust for problems during the lesson.

Provide opportunities for guided and independent practice

C. Closure:

Closure is an opportunity to insure students have learned the main idea of the lesson. The closure should be drawn from them. Ask them questions, ask them to summarize steps, to do another example, to apply information in a new situation or draw conclusions. You might make a link to the next lesson as well.

D. Follow-up activity: Independent Practice, Enrichment or Reinforcement: 


You may give students a chance to do something independently which will give you a chance to do formative evaluation or to enable them to carry the activity further and apply learning in a personal way. This step makes learning more permanent. It could be an in- class activity which is completed later, a learning center, seat work, or home work.

E. Evaluation of the lesson and the teaching process:

How will you evaluate the lesson in addition to student achievement specified in your objective?

You will complete the evaluation after the lesson has been taught. It is a time for you to reflect on the lesson. What were the strengths of the lesson. What worked well? What were problem areas? How could you improve the lesson? What could you do differently if you were to teach it again? What is an alternate way to present the same material?  

Evaluation

E. Evaluation of the lesson and the teaching process:

How will you evaluate the lesson in addition to student achievement specified in your objective?

You will complete the evaluation after the lesson has been taught. It is a time for you to reflect on the lesson. What were the strengths of the lesson. What worked well? What were problem areas? How could you improve the lesson? What could you do differently if you were to teach it again? What is an alternate way to present the same material?  

Conclusion

I will then, let you present your lesson to the class by group and  will be graded accordingly,.                             

-------------------------------------------------------------------------------------------

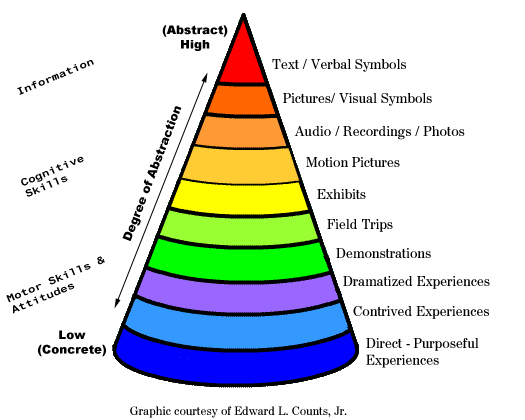
To sum it up, we will go back to what E. Dale's CONE OF EXPERIENCE taught us...


that teaching and learning must be descriptive and not prescriptive and that we can emplore a more suitable method for individual learners depending on their needs and your objective as their teacher.

Credits

I would like to thank the following for my links, slides and imagaes:

google.com 

slideshare.net (for my prepared powerpoint presentation)

BU-CCT20013-20014 group page on facebook

------------------------------------------------------------------------------------

and our beloved Ed.tech.professor: Prof. Gerard M. Protacio 

Teacher Page

This webquest is designed for Certificate in Collge Teaching students and other EDtEch. learners.

and also serves as a prerequisite requirement for EDtech. subject in CCT Batch 20013-20014.

[img_assist|nid=9226|title=teacher|desc=|link=none|align=center|width=719|height=1098]

ENJOY!!

[img_assist|nid=9227|title=SUBMITTED BY|desc=|link=none|align=center|width=574|height=470]

This webquest is prepared by MS.CHERRY CORRAL CCT block A student.